
If you’ve ever stood in the aisle staring at a shiny DIY epoxy kit, you’re not alone. The box makes it look easy: clean the floor, roll on the coating, and your garage turns into a showroom. Sometimes that really does happen. But after years of working on concrete floors, we’ve learned something that surprises a lot of homeowners: the epoxy itself is rarely the reason a floor fails. Prep is.
Here in Virginia, that matters even more than people expect. Between coastal air, summer humidity, and quick-moving storms, concrete slabs can hold moisture and “breathe” in ways that mess with coatings. A garage floor that looks dry can still be pushing vapor up from below, especially in Virginia Beach, Norfolk, Chesapeake, and Suffolk, where the air stays heavy for long stretches.
So if you’re asking, “Should I do a DIY kit or hire a pro?” here’s the neighbor-over-coffee answer. We’ll walk through what you’re really buying, what a pro does differently, and why prep decides how long your floor lasts. And even if you decide to DIY, we’ll help you dodge the mistakes that lead to peeling and wasted weekends.
The Big Problem: Most Failures Aren’t About the Epoxy
When an epoxy floor peels, most people blame the product. “That epoxy was junk.” “The kit must’ve been bad.” But in our experience, most failures aren’t caused by bad epoxy. They’re caused by a floor underneath that wasn’t ready. Epoxy is basically a tough plastic coating, and it needs something clean, solid, and properly textured to grip. If it can’t bond, it will eventually let go.
The usual culprits are pretty consistent:
- Dirty concrete
- Moisture vapor pushing up from below
- The wrong concrete texture (called “profile”)
- Rushed cure times
- Skipped repairs
Here’s the tricky part: you can do 80% of the job right and still have the floor fail if you miss one of the big prep steps. That’s why some DIY floors look great for a month, then start peeling near the garage door, bubbling in the middle, or lifting where the tires sit.
We had a homeowner in Norfolk call us after their floor started peeling in strips near the garage door. They’d cleaned it, etched it, and followed the kit directions exactly. The problem wasn’t effort. Moisture was coming in at the edge, and the surface never got the right grip for the coating to lock into. That’s the kind of issue you don’t see until it’s too late.
If there’s one takeaway from this whole article, it’s this: epoxy is a system, not just a paint color. The coating is only as strong as the prep and conditions underneath it.
Quick Answer: Which Route Fits Your Garage?
DIY epoxy kits can work in the right situation, but they’re less forgiving. A pro install costs more upfront, but you’re paying for the prep, testing, equipment, and process control that make a floor last.
Think of it like cooking from a box. A boxed meal can taste great if your oven temperature is right and you follow every step. But if your oven runs hot, your timing is off, or your pan isn’t right, that same box turns into a mess. Epoxy works the same way, except the “mess” can mean grinding the whole floor off later.
A DIY kit makes sense if:
- Your concrete is newer, solid, and not dusty or flaking
- You’re okay with a “good enough” finish, not a showroom look
- The garage sees light traffic (one car, storage, no heavy tools)
- You can control conditions like temperature, humidity, and cure time
- You’re willing to do real prep, not just a quick wash
A pro install makes sense if:
- You want a long lifespan and a consistent finish
- You’ve had peeling before, or the slab is older and stained
- You’ve noticed moisture signs like dark spots or damp edges
- You park hot tires daily and want the floor to hold up
- You want a warranty and less risk
Watch for these red flags that DIY will likely fail:
- Oil stains that keep coming back after cleaning
- Smooth, hard concrete where water beads up instead of soaking in
- Cracks, pitting, or patched areas throughout the slab
- Humid weather with no way to control airflow or temperature
- Relying on acid etching alone and hoping it works like grinding
Showstopper Painting
Should I DIY or hire a pro?
Question 1 of 4
How does your concrete look?
Question 2 of 4
Have you noticed any of these?
Question 3 of 4
How will you use the space?
Question 4 of 4
What matters most to you?
Your garage sounds DIY-friendly
Where DIY kits actually work well:
- A newer, clean slab with little to no staining
- A garage used more for storage than heavy work
- A homeowner willing to take their time and not rush the cure
- A floor you'd be fine redoing sooner if needed
What to expect
- Kit cost range: roughly $150–$600, depending on brand and square footage
- Typical lifespan: 1–3 years, sometimes more in ideal conditions
- Prep still matters — cleaning, degreasing, and real grinding or etching, not just a quick wash
Your garage is a judgment call
Why this is borderline
- Your answers mix low-risk and higher-risk signals — the kind of situation where a floor can look fine for a while and then fail near edges or tire paths
- Moisture testing is the best way to know for sure whether a slab is pushing vapor you can't see
- A pro can tell you in one visit whether your slab is a safe DIY candidate or needs real prep first
A pro install is the safer bet here
What a pro install includes:
- Mechanical grinding or shot blasting for a consistent surface profile
- Moisture testing to check whether the slab is pushing vapor
- Crack repair and patching before coating
- A primer, base, and topcoat system matched to your slab and how you use the garage
- Controlled thickness and cure/recoat timing
What to expect
- Typical lifespan: often 5–10+ years, depending on system and use
- Workmanship warranty or guarantee (varies by contractor)
- Serving Virginia Beach, Norfolk, Chesapeake, and Suffolk
If you’re still on the fence, keep reading. Next, we’ll break down what’s actually in DIY kits, what pros do differently, and which prep steps really matter.
DIY Epoxy Kits: What You’re Really Buying
DIY kits are popular for good reason. They’re accessible, affordable, and promise a big visual upgrade fast. But here’s what we want you to know upfront: most kits are designed to be easy, not bulletproof. That doesn’t make them useless. It just means you need realistic expectations and a slab that’s friendly to coatings.
A typical kit is more of an entry-level system. It can look great right after you apply it. The real question is what happens after a Virginia summer, a few rainy weeks, and daily hot tire parking. That’s when prep and coating thickness start to show their true colors.
What’s Usually in a DIY Kit
- One- or two-part epoxy, often thinner than pro-grade systems
- Decorative flakes for looks and light texture
- A small bag of etching solution or mild cleaner
- Basic instructions and a recommended roller setup
- Sometimes a clear topcoat, often less durable than pro urethane or polyaspartic options
Marketing Claims vs. Reality
- “No grinding needed” usually means less prep, not a better bond
- “One-day floor” often stretches longer once humidity slows the cure
- “Industrial strength” kits are often thinner and softer than commercial systems
- “Hot tire resistant” depends heavily on thickness, cure time, and topcoat choice
- “Works on any concrete” isn’t quite true. Moisture and contamination can still ruin the bond
Where DIY Kits Actually Work Well
- A newer, clean slab with little to no staining
- A garage used more for storage than heavy work
- A homeowner willing to take their time and not rush the cure
- A floor you’d be fine redoing sooner if needed
We’ve seen DIY floors turn out great when the slab is clean, dry, and properly prepped. We’ve also seen plenty fail because the slab wasn’t as simple as it looked. Next, let’s talk about what you’re actually paying for with a pro epoxy install, because it’s not just the coating.
Pro Install: What You’re Actually Paying For
When you hire a pro for an epoxy floor installation, you’re not just paying for nicer materials. You’re paying for prep equipment, testing, repair work, and the process discipline that makes the coating bond and stay bonded. That’s the difference between a floor that looks great for a year and one that still looks great years later.
A professional install works like a controlled system. We create the right surface texture, fix weak spots, check for moisture issues, and apply the coating at the right thickness with the right timing. That control matters even more in Virginia, where humidity and temperature swings can shrink your margin for error. This applies to both home garages and commercial epoxy floors, where durability matters even more.
What Pros Do That DIY Projects Usually Skip
- Mechanical grinding or shot blasting, which is essentially sanding concrete with a machine so the coating has something to grab
- Crack repair and patching so weak areas don’t show through the coating later
- Moisture testing to check whether the slab is pushing vapor that could cause bubbling or peeling
- A primer, base, and topcoat system matched to your slab and how you use the garage
- Controlled cure and recoat windows so layers bond chemically, not just dry on the surface
- Thickness control, which matters a lot for durability and hot tire resistance
We had a homeowner in Virginia Beach whose garage floor “sweated” every summer. They assumed it was just humidity in the air. Once we tested the slab, it turned out moisture was actually moving through the concrete itself. In that case, the right prep and product system mattered far more than the brand name on the bucket. You can see how this process typically unfolds in our step-by-step epoxy installation guide for Virginia Beach.
Why Prep Decides Lifespan
We like to explain prep with a simple comparison: epoxy is like building a house. The coating is the pretty part you see. Prep is the foundation. If the foundation is weak, the house cracks. If the prep is weak, the epoxy peels.
Prep isn’t just cleaning. It’s making sure the concrete is strong, dry enough, and textured the right way. It also means dealing with the stuff garages are famous for: oil drips, tire residue, old sealers, and mystery stains that have soaked in for years. In coastal Virginia, add one more layer: humidity and moisture vapor that can show up even when the surface looks bone dry.
Acid Etching vs. Grinding
Acid etching tries to rough up concrete chemically, while grinding physically cuts the surface to create a consistent texture. Etching can be uneven, since some spots react and others don’t, which is why grinding usually wins. It’s more predictable and removes weak surface layers that etching leaves behind. Many peeling floors we see were etched but never truly profiled.
What “Concrete Profile” Really Means
Concrete profile is simply the texture the coating needs to grip. If the surface is too smooth, epoxy just sits on top like a sticker. With a proper profile, epoxy locks in more like Velcro. Pros aim for a consistent profile across the whole floor, including the edges, which is where most DIY jobs fall short.
Moisture Vapor: Why Slabs “Breathe”
Concrete isn’t waterproof. It’s porous, which means moisture can move up from the ground through the slab. When that vapor hits a coating, it can create pressure underneath, and pressure leads to bubbles, pinholes, and delamination. Humid seasons and storm cycles tend to make this worse.
Oil Contamination: Why It’s So Stubborn
Oil soaks deep into concrete pores, not just the surface. Degreasing helps, but it often takes multiple rounds to fully clear it out. If oil remains, epoxy can’t bond properly, and that contamination often shows up later as peeling in the exact spots where tires sit.
Edge and Corner Prep: Where Peeling Usually Starts
Most DIY prep focuses on the open middle of the floor. Edges, corners, and the garage door threshold are harder to reach, and they often hold the most moisture and contamination. That’s exactly why peeling frequently starts at the edges and spreads inward.
We had a homeowner in Chesapeake whose epoxy looked perfect in the middle but peeled in a six-inch strip along the wall and near the door. Their DIY prep was solid overall, but the edges weren’t ground well, and moisture near the door threshold did the rest. That’s why pros obsess over the “boring” parts of prep. For more on how epoxy durability holds up over time, see our guide on how many years you can expect from an epoxy floor.
Failure Modes: How Epoxy Floors Actually Fail
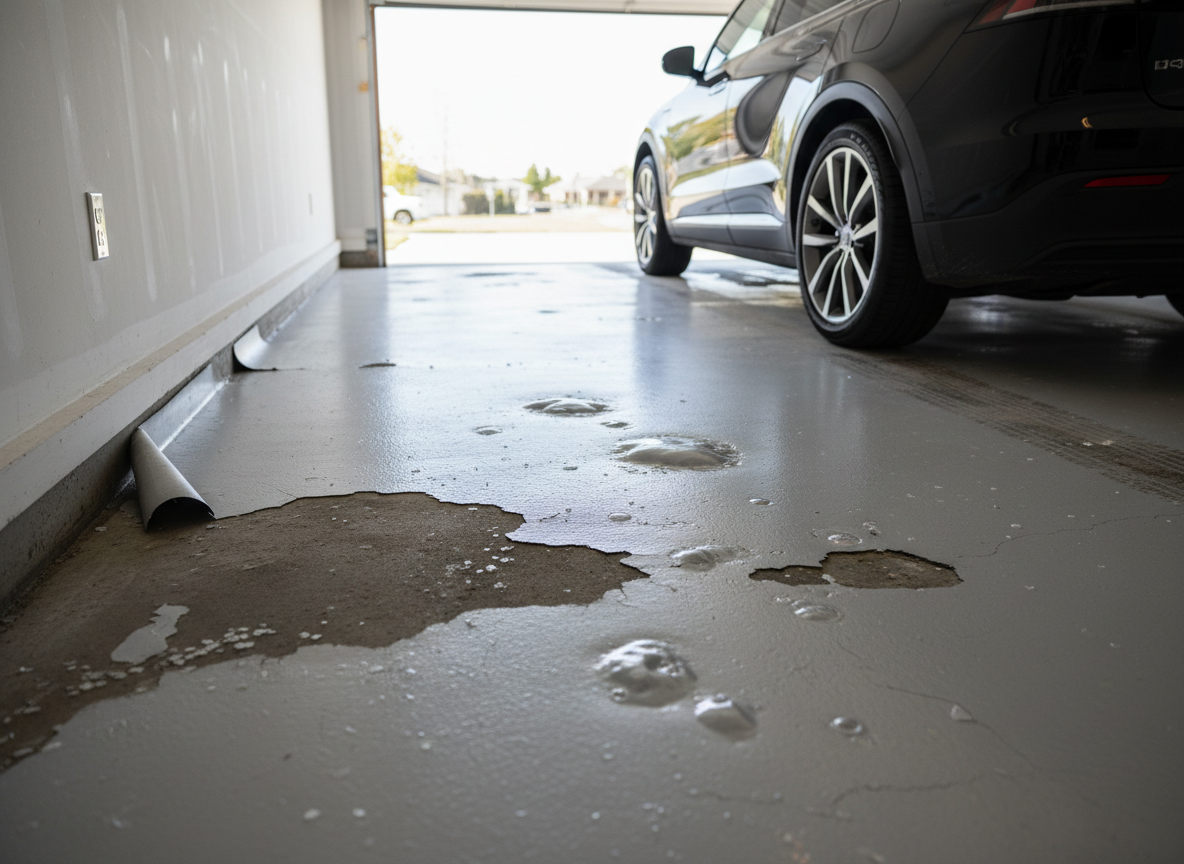
Epoxy failures usually don’t happen all at once. They show up as small warning signs: a bubble here, a peeling corner there, a patch that looks slightly different, or a spot that stays tacky longer than it should. The good news is that most failures are predictable once you know the cause. The bad news is that once the bond is compromised, the fix often means grinding and starting over. Our guide on repairing and refinishing epoxy floors covers this in more detail.
Peeling or Delamination
This is usually caused by a poor surface profile, dust, oil, or moisture vapor. It often starts at edges, corners, and near the garage door. A common DIY trigger is etching without getting a consistent profile.
Hot Tire Pickup
This happens when the coating is too thin, not fully cured, or paired with the wrong topcoat. Hot tires can soften some coatings and pull them right up. A common DIY trigger is parking too soon or using a thinner kit coating.
Bubbles and Pinholes
These come from moisture vapor, outgassing from the concrete, or applying the coating during hot weather. Air or moisture tries to escape and gets trapped in the coating. A common DIY trigger is coating on a hot afternoon or right after rain or a humidity spike.
Yellowing or Chalking from UV Exposure
Epoxy isn’t naturally UV-stable, so sunlight through garage windows or an open door can discolor it over time. This usually happens when there’s no UV-stable topcoat, like a quality urethane or polyaspartic. Read more in our article on why epoxy floors turn yellow in Virginia Beach garages.
Slippery Finish
A smooth topcoat combined with moisture and dust can make a floor slippery, which is a real concern during storm season when garages track in water. The fix is usually a traction additive or a system built for grip from the start. See our breakdown of anti-slip epoxy coatings for options.
If you’re thinking, “Okay, I get it, prep matters,” you’re right. Here’s a side-by-side look to help you decide with confidence.
DIY vs. Pro Install: Side-by-Side Comparison
| Category | DIY Epoxy Kit | Pro Install |
|---|---|---|
| Prep method | Cleaning and etching, sometimes light sanding | Mechanical grinding or shot blasting plus detailed cleaning |
| Moisture testing | Rarely done | Commonly done, with mitigation options available |
| Crack repair | Basic patch, often skipped | Proper crack chase, fill, patching, and leveling |
| Coating thickness | Usually thinner | Controlled thickness built for durability |
| Cure time reality | Often longer than expected in humidity | Managed cure and correct recoat windows |
| Lifespan expectations | 1–3 years, sometimes more in ideal conditions | Often 5–10+ years depending on system and use |
| Warranty | Product warranty varies; labor is on you | Workmanship warranty or guarantee (varies by contractor) |
| Total true cost | Lower upfront, higher redo risk | Higher upfront, lower redo risk |
| Best for | Low-traffic garages, “good enough” finish | Daily parking, workshops, long-term durability |
Cost Breakdown: What You’re Really Comparing
Cost is a big reason people consider DIY, and that’s understandable. But the honest comparison isn’t just kit price versus contractor price. It’s materials plus tools plus time plus risk. If your DIY floor fails, the redo cost can end up being the most expensive part, since removing epoxy is far more involved than a simple scrape-and-recoat job.
In Virginia summers, DIY timelines also tend to stretch because humidity and temperature affect cure times. That “one weekend project” can turn into several days of waiting, recoating, and trying to keep dust off the floor while it cures.
DIY kit cost range: Typically $150–$600 or more, depending on brand and square footage. Add-ons like flakes or clear coat can push the price higher.
Tool rental costs to expect:
- Concrete grinder rental
- Diamond cup wheels or grinding segments
- Shop vac or dust-control vacuum, which matters for good bonding
Consumables you’ll likely need:
- Degreaser and scrub brushes
- Crack filler or patch compound
- Painter’s tape, rollers, and mixing buckets
- Gloves, a respirator, and eye protection
Time costs people tend to underestimate:
- Cleaning and degreasing often take longer than the coating itself
- Repairs and drying time can add several days
- Cure time can mean no parking for longer than planned
- Redo costs after a failed DIY job are labor-heavy and may require professional removal first
If you’re leaning toward hiring a pro, the next section will help you choose the right contractor and avoid vague “prep included” promises that don’t actually protect your floor.
How to Choose the Right Contractor
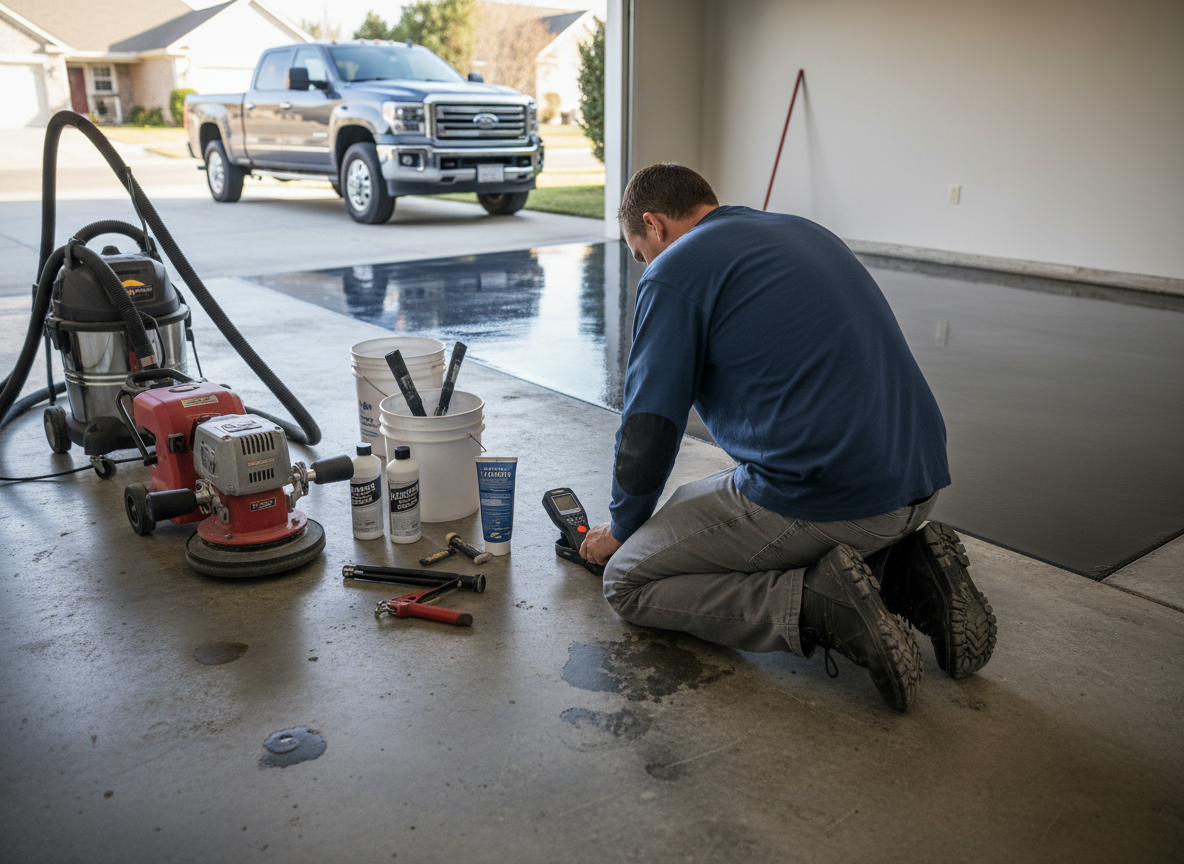
Not all “pro installs” are the same. The best results come from contractors who can clearly explain their prep process, show you what they’re doing, and match the system to your slab and your goals. If someone is vague about prep, that’s usually a warning sign. It’s worth reading our take on whether hiring a professional painter is worth it for a broader look at this same tradeoff.
We tell homeowners to focus less on brand names and more on process. A great product applied over poor prep still fails. A solid system applied over properly prepared concrete usually performs well, even through Virginia’s humidity swings.
Questions to Ask a Contractor
- How do you prep the concrete: grinding or etching?
- Do you test for moisture vapor?
- How do you handle cracks and pitting?
- What coating system are you using for primer, base, and topcoat?
- What’s the cure time before I can park?
- What happens if it peels? What’s covered?
What Real Prep Should Include
- Mechanical grinding or shot blasting for a consistent profile
- Thorough vacuuming and dust control
- Degreasing where needed, more than once if necessary
- Crack repair and patching before coating
- Edge and corner prep, not just the open middle
Photos You Should Expect to See
- Before photos showing the slab’s condition and any staining
- During photos showing the floor after grinding, with a uniform texture visible
- After photos showing full coating coverage and the final finish
What a Real Warranty Looks Like
A solid warranty spells out clear terms for what’s covered and for how long. It should be written down, not just a verbal promise to “stand by our work,” and it should explain the conditions that affect performance. For details on how estimates should be structured, see what’s actually included in a professional paint estimate. You can also review our own commitment through our money-back guarantee and our full guarantee details.
Next, let’s zoom in on Virginia-specific conditions, because what works in a dry climate doesn’t always behave the same way near the coast.
Virginia-Specific Advice: Humidity, Storms, and Coastal Air
Virginia garages deal with a unique mix of conditions: humid summers, salty coastal air, and storm seasons that can shift quickly. Unlike a living room floor, a garage is constantly changing, with hot cars rolling in, doors opening and closing, rainwater blowing in, and concrete that can “sweat” when warm air hits a cooler slab. All of that affects how epoxy cures and how well it bonds over time.
We’ve seen it happen plenty of times in Virginia Beach and Norfolk: a homeowner coats the floor during a humid stretch, everything looks fine at first, and then a few weeks later tiny bubbles or cloudy spots show up. That doesn’t always mean the product was bad. It often means moisture vapor or humidity interfered with the cure, or the slab was holding water from recent storms. In our area, weather conditions aren’t just background noise. They’re part of the job.
How Humidity and Storm Seasons Change the Job
- High humidity can slow cure times and shrink recoat windows
- Storm cycles can raise moisture levels in and under the slab
- Coastal air can keep garages damp longer, especially near the door
- Big temperature swings between hot days and cool nights can cause condensation on concrete
The “Sweating” Garage Problem
Concrete can stay cooler than the surrounding air in summer. When warm, humid air hits that cooler slab, it condenses, much like a cold drink sweating on a hot day. That surface moisture can interfere with bonding if you coat too soon, and it can also be a sign the slab is pushing vapor from below.
Timing and Cure Windows in Virginia
A “one-day” coating schedule can easily turn into multiple days if humidity stays high. If you miss the recoat window, layers may not bond as well as they should. Coating late in the day can also mean higher humidity overnight during the cure. And rushing to park a car on a fresh floor is one of the fastest ways to cause hot tire pickup.
Why Local Conditions Make Testing More Important
Moisture testing helps you avoid coating a slab that’s actively breathing. Proper grinding helps epoxy bond even when conditions aren’t perfect, and edge prep matters more here because moisture often shows up first at the perimeter. A pro can also adjust the system, including primer and topcoat choices, based on what the slab is actually doing.
We had a homeowner in Suffolk who swore their slab was bone dry, because it looked dry every afternoon. But early mornings told a different story, with light dampness near the garage door and along one wall. That’s exactly the kind of situation where a DIY kit can look great for a bit, then start peeling at the edges. When we see that pattern, we slow down, test, and build the system around the slab, not the other way around.
At this point, you’ve got the “why.” Here’s a quick FAQ recap, followed by a friendly wrap-up and a no-pressure next step.
Frequently Asked Questions
Should I use a DIY epoxy kit or hire a pro?
DIY can work if your slab is clean, dry, and in great shape, and you’re okay with a simpler finish and higher risk. A pro install makes more sense when you want a long lifespan, better durability, and prep or testing that reduces the risk of peeling.
Why do epoxy floors peel?
Most peeling happens because the epoxy didn’t bond well. Common causes are dirty concrete, oil contamination, moisture vapor coming through the slab, and not getting the right concrete texture, called “profile,” for the coating to grab onto.
What prep actually matters most?
The biggest factors are mechanical surface prep, usually grinding, deep cleaning and degreasing, repairing cracks and weak concrete, and checking moisture conditions. Those steps decide whether the coating bonds or fails.
Is acid etching enough for epoxy?
Sometimes, but it’s less reliable. Etching can be uneven and may not create the consistent texture epoxy needs. Grinding usually wins because it creates a predictable surface profile and removes weak surface layers.
How long will a DIY epoxy floor last?
In ideal conditions, a DIY kit can last a few years. But if the slab has moisture, oil, or a poor profile, it can fail much sooner, sometimes within months, especially near edges and tire paths.
How long will a pro-installed epoxy floor last?
Many pro systems last 5 to 10 or more years, depending on the system used, how the garage is used, and how well the slab is prepped and maintained.
What does a pro do differently than DIY?
Pros typically grind or shot blast the concrete, repair cracks properly, test for moisture vapor, use a multi-layer system with primer, base, and topcoat, control thickness, and manage cure and recoat timing.
What is “concrete profile” in plain English?
It’s the texture epoxy needs to grip. If concrete is too smooth, epoxy sits on top and can peel. If it’s properly textured, epoxy locks in and holds.
Why do bubbles or pinholes show up in epoxy?
Usually from moisture vapor or air escaping from the concrete, especially if the coating is applied in heat or during humid or stormy conditions.
Why does epoxy turn yellow?
Epoxy isn’t naturally UV-stable. Sunlight from open garage doors or windows can cause yellowing unless you use a UV-stable topcoat.
How do I know if my garage has moisture issues?
Clues include dark, damp-looking areas, “sweating” concrete in summer, peeling near the garage door, and recurring dampness along edges. Moisture testing is the best way to know for sure.
Which Should You Choose?
Should you use a DIY epoxy kit or hire a pro? If your slab is clean, dry, and in great shape, and you’re fine with a simpler finish and a shorter lifespan, a DIY kit can be a reasonable choice. But if your garage has oil staining, moisture signs, lots of cracks, or you want the floor to hold up through Virginia summers and daily hot tire parking, a professional install is usually the safer bet. Prep decides lifespan, and prep is where pros earn their keep. If common myths are still shaping your decision, it’s worth a quick read through our post on epoxy flooring myths.
If you want help figuring out what your slab is really telling you, our team at Showstopper Painting is happy to talk it through. We serve Virginia Beach, Norfolk, Chesapeake, and Suffolk, and we’ll give you a straight answer, even if you decide to DIY. No pressure. If you just want a few practical pointers before you start, we’re glad to point you in the right direction.